I recently spoke with the main developer and maintainer of SikuliX, Raimund Hocke, on Episode 40 of my TestTalks podcast. What's cool about SikuliX is that it allows you to automate anything you see on your screen using image-based testing. After speaking with Raimund I thought it would also be helpful to create a quick video to show you just how easy it is to get started with SikuliX.
After you try this example, be sure to listen to Raimund Hocke: Getting Started with SikuliX Image-Based Testing on TestTalks for a deeper dive into SikuliX.
For this illustration, I'll be using Java and Maven.
Create a new Maven project then add the SikuliX repository information in your pom.xml file. Since SikuliX is still under development, you'll need to add the location to the snapshot stored on OSSRH:
<repositories>
<repository>
<id>com.sikulix</id>
<name>com.sikulix</name>
<url>https://oss.sonatype.org/content/groups/public</url>
<layout>default</layout>
<snapshots>
<enabled>true</enabled>
<updatePolicy>always</updatePolicy>
</snapshots>
</repository>
</repositories>
Next add the SikuliX and JUnit dependency information in your pom.xml file:
<dependency>
<groupId>com.sikulix</groupId>
<artifactId>sikulixapi</artifactId>
<version>1.1.0-SNAPSHOT</version>
</dependency>
<dependency>
<groupId>junit</groupId>
<artifactId>junit</artifactId>
<version>4.11</version>
</dependency>
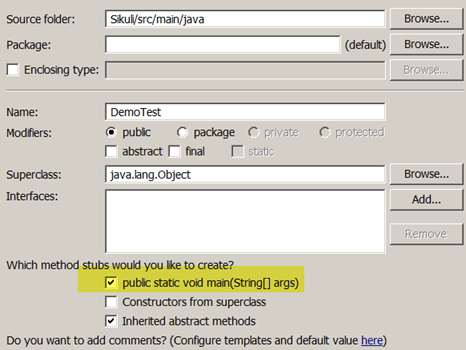
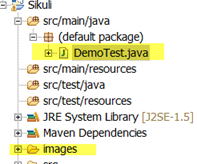
Next create a new class named DemoTest

Create a new folder in your project named images

Open up the DemoTest class and add the following import statements:
import org.sikuli.script.*;
import static org.junit.Assert.*;
Right click on your project and Run as Maven Install
Create a Screen instance. The Screen allows you to click on regions within the screen:
Screen s = new Screen();
Open up your Calculator and capture images for all the areas of the Calculator that you want to interact with. For this example I'm clicking on 8 * 3 = and verifying the total of 24. Save your images to the images directory we created earlier. (I'm using Snagit to get the images.)
Next let's add the actions we want to perform against the Calculator. Pretty much everything we are doing is a click, so add the following:
import org.sikuli.script.*;
import
static org.junit.Assert.*;
public
class DemoTest {
public
static
void main(String[] args) {
Screen s = new Screen();
try {
s.click(“images/8.png”);
s.click(“images/multiply.png”);
s.click(“images/3.png”);
s.click(“images/equals.png”);
assertNotNull(“Verify correct value”, s.exists(“images/result.png”));
} catch (FindFailed e) {
e.printStackTrace();
}
}
}
I also added an assertNotNull to verify the value that I expected to exist (24).
Right click on the DemoTest.java and run as a Java Application
If everything goes as planned you should have no errors in your console output!
I hope this helps and whets your appetite for learning more about image-based testing using SikuliX. (Note: An excellent resource for learning more is Raimund's SikuliX website.)


